Prep Time: 20 minutes Chill Time: 4 hours (or overnight) Total Time: 4 hours 20 minutes Difficulty: Easy Servings: 8–10 slices Introduction Craving a rich and indulgent dessert but don’t want to turn on the oven? This No-Bake German Chocolate Pie is everything you love …
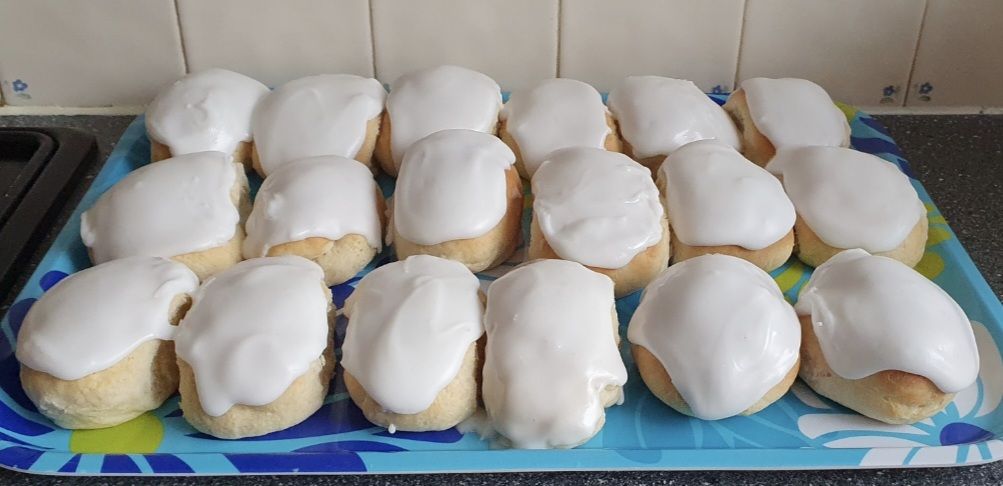
Soft, fluffy yeast buns with sweet icing — just like the bakery!
Prep Time: 25 minutes
Rise Time: 1 hour 30 minutes
Bake Time: 12–15 minutes
Total Time: About 2 hours 15 minutes
Difficulty: Moderate
Makes: 10–12 buns
Introduction
Iced Buns are a beloved classic in British bakeries — soft, slightly sweet buns topped with glossy white icing. Some versions are left plain on the inside, while others are filled with jam, whipped cream, or custard.
These buns are light and airy, with a deliciously sticky top and endless room for personalization. They’re perfect for tea parties, after-school treats, or just for baking something nostalgic.
Ingredients
For the Buns:
3 ½ cups (450g) strong white bread flour
1 packet (7g) instant yeast
¼ cup (50g) caster sugar
1 tsp salt
¾ cup (180ml) warm milk
¼ cup (60ml) warm water
1 large egg, lightly beaten
¼ cup (50g) unsalted butter, softened
For the Icing:
1 ½ cups (180g) icing sugar (powdered sugar)
1–2 tbsp cold water or milk
A few drops of vanilla or almond extract (optional)
Food coloring (optional)
Optional Fillings:
Jam (strawberry, raspberry, or blackcurrant)
Sweetened whipped cream
Custard
Buttercream
Instructions
Step 1: Make the Dough
In a large bowl or stand mixer, combine the flour, yeast, sugar, and salt.
Add warm milk, warm water, and beaten egg. Mix until combined.
Add softened butter and knead for 8–10 minutes (or 5–6 minutes in a stand mixer with a dough hook) until smooth and elastic.
Form into a ball and place in a lightly oiled bowl. Cover with a towel or plastic wrap.
Step 2: First Rise
Let the dough rise in a warm place for 1 hour, or until doubled in size.
Step 3: Shape the Buns
Punch down the dough and divide into 10–12 equal pieces.
Shape each piece into a smooth oval or sausage shape by tucking the edges under.
Place on a parchment-lined baking tray, spacing slightly apart but close enough they might touch when baked.
Cover loosely and allow to rise again for 30–40 minutes until puffy.
Step 4: Bake
Preheat your oven to 375°F / 190°C (170°C fan / Gas mark 5).
Bake buns for 12–15 minutes, or until lightly golden on top.
Transfer to a wire rack and let cool completely before icing or filling.
Step 5: Make the Icing
In a bowl, sift the icing sugar.
Add 1 tablespoon of water or milk and mix. Add more liquid a few drops at a time until smooth but thick enough to cling to the bun.
Add a drop of vanilla extract or a touch of color if desired.
Step 6: Ice the Buns
Spread or spoon icing over the top of each bun. Let set for 10–15 minutes.
For a glossy finish, dip the tops into the icing and let the excess drip off.
Step 7: Fill the Buns (Optional)
Once the buns are iced and set, slice horizontally (but not all the way through, like a hot dog bun).
Pipe or spoon in jam, whipped cream, or custard.
Storage & Freezing
Room Temp: Store in an airtight container for 2–3 days
Refrigerate: If filled with cream, refrigerate and eat within 24 hours
Freeze: Un-iced buns can be frozen for up to 2 months. Thaw and ice when ready to serve
Nutrition Info (Per Bun, Approximate – unfilled)
Nutrient
Amount
Calories
230 kcal
Carbohydrates
38 g
Protein
5 g
Fat
6 g
Saturated Fat
3 g
Sugar
10 g
Sodium
150 mg
Fiber
1 g
Serving Suggestions
Serve with a hot cup of tea
Dust lightly with powdered sugar for extra charm
Decorate with sprinkles, glacé cherries, or edible glitter
Fill with raspberry jam & whipped cream for a bakery-style treat
Variations
Version
What to Do
Pink Iced Buns
Add pink food coloring to the icing
Custard-Filled
Fill with thick vanilla custard
Coconut Topped
Sprinkle desiccated coconut on wet icing
Chocolate Iced
Add cocoa powder or melted chocolate to icing
Lemon Iced
Add lemon juice/zest to the icing
Why You’ll Love This Recipe
Bakery-style buns from your own kitchen
Soft, sweet, and satisfying
Customizable with fillings, toppings, or icing colors
Kid-friendly and nostalgic
Great for tea parties, birthdays, or special treats
Final Thoughts
Whether you grew up with them or are discovering them for the first time, Homemade Iced Buns are a joy to bake and share. They’re simple yet beautiful, indulgent yet light — and nothing beats the smell of freshly baked buns cooling on the rack.
Air Fryer Pizza Toast Crispy, cheesy, and ready in under 10 minutes! Prep Time: 5 minutes Cook Time: 5–7 minutes Total Time: 10–12 minutes Difficulty: Super Easy Servings: 2–4 slices (1–2 people) Introduction Craving pizza but don’t want to deal with dough or delivery? This …
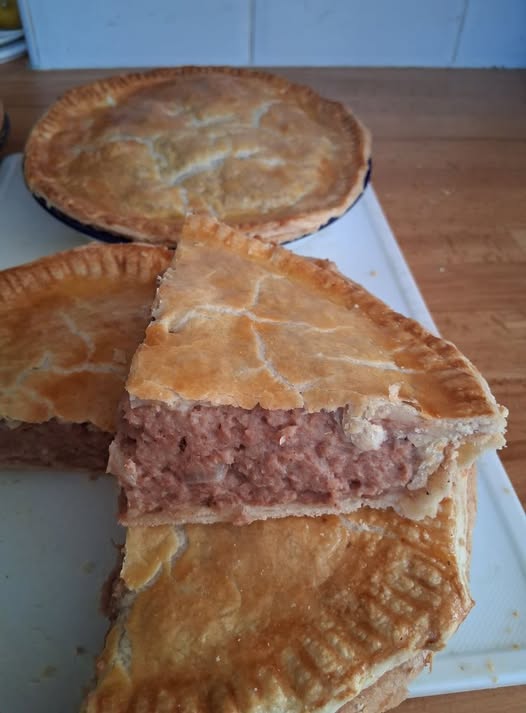
These Corned Beef, Onion, and Potato Pies are a savory staple, especially popular in the UK and Ireland. Made with pantry ingredients — canned or leftover corned beef, creamy potatoes, and sweet sautéed onions — the filling is encased in buttery pastry and baked until golden and crisp.
Perfect for weeknight meals, packed lunches, or picnics, these pies are both budget-friendly and soul-satisfying.
Ingredients
For the Filling:
1 tbsp butter or oil
1 medium onion, finely chopped
2 medium potatoes, peeled and diced (about 2 cups)
Salt and black pepper, to taste
1/2 tsp dried thyme or mixed herbs (optional)
1 (12 oz / 340g) can corned beef, chopped
Splash of milk or beef stock, if needed for moisture
For the Pastry:
2 cups (250g) all-purpose flour
1/2 cup (115g) cold butter, diced
1/2 tsp salt
4–6 tbsp cold water
Alternatively, use 2 sheets of store-bought shortcrust pastry.
For Assembly:
1 egg, beaten (for egg wash)
Optional: sesame seeds or flaky salt for topping
Instructions
Step 1: Make the Pastry
In a large bowl, combine flour and salt. Add cold butter and rub together with fingers until it resembles breadcrumbs.
Add cold water a tablespoon at a time, mixing until dough comes together.
Form into a disk, wrap in plastic, and chill for at least 30 minutes.
While the pastry chills, prepare the filling.
Step 2: Prepare the Filling
In a pan over medium heat, melt butter and add chopped onion. Sauté for 5–6 minutes until soft.
Add diced potatoes and season with salt, pepper, and herbs. Cook for about 10–12 minutes, stirring, until potatoes are fork-tender. Add a splash of water or stock if sticking.
Stir in chopped corned beef and heat until fully combined and warm. Remove from heat.
Let the mixture cool slightly before assembling pies.
Step 3: Assemble the Pies
Preheat oven to 375°F (190°C).
Roll out pastry to about 1/8 inch thick on a floured surface.
Cut into circles or rectangles large enough for your pie tins (or form freehand hand pies).
Place a spoonful of filling in the center of each base.
Top with another piece of pastry. Press edges to seal (use a fork for a decorative crimp).
Cut a small steam vent in the top of each pie.
Brush tops with beaten egg.
Step 4: Bake
Place pies on a baking tray lined with parchment.
Bake for 30–35 minutes, or until golden brown and crisp.
Let cool slightly before serving.
Storage & Reheating
Fridge: Store in an airtight container for up to 3–4 days
Freezer: Freeze before or after baking (wrap tightly); bake from frozen at 350°F for 40–45 minutes
Reheat: Oven at 350°F (175°C) for 10–15 minutes, or air fryer at 325°F for 5–6 minutes
Nutrition (Per Pie, Approximate)
Nutrient
Amount
Calories
420 kcal
Carbohydrates
28 g
Protein
13 g
Fat
28 g
Saturated Fat
10 g
Fiber
2 g
Sodium
700 mg
Values vary based on pastry type and meat used.
Serving Suggestions
Serve hot with mushy peas, baked beans, or a simple green salad
Add a dollop of brown sauce, English mustard, or chutney on the side
Enjoy cold for a traditional picnic or lunchbox treat
Variations
Variation
Description
Cheesy Pie
Add ½ cup grated cheddar to the filling
Spicy Version
Add chopped jalapeños or a pinch of cayenne
Vegetarian Option
Swap corned beef for sautéed mushrooms or lentils
Mini Party Pies
Use muffin tins to make bite-sized pies
Puff Pastry Upgrade
Use puff pastry for a lighter, flaky crust
Why You’ll Love This Recipe
Classic comfort food
Great use for canned or leftover corned beef
Easy, freezer-friendly, and versatile
Ideal for make-ahead meals or gatherings
Budget-friendly and filling
Final Thoughts
Corned Beef, Onion, and Potato Pies are the kind of humble, nostalgic dish that never goes out of style. Crispy on the outside, soft and savory inside, they’re perfect for feeding a crowd, stocking the freezer, or enjoying with a hot cup of tea on a rainy afternoon.
Whether you’re bringing a taste of the UK to your kitchen or just craving a hearty bake, this recipe brings comfort and flavor in every bite
Prep Time: 30 minutes Bulk Fermentation: 4–5 hours Cold Proof: 8–12 hours (overnight) Bake Time: 20–25 minutes Total Time: 13–18 hours Difficulty: Intermediate Makes: 6 large sub buns Introduction Upgrade your sandwich game with these Homemade Sourdough Italian Herb and Cheese Sub Buns. These bakery-style …
Prep Time: 10 minutes Cook Time: 15 minutes Total Time: 25 minutes Difficulty: Medium Servings: 2 Introduction If you want to impress with a rich, restaurant-style dinner at home, Juicy Steak with Creamy Garlic Sauce is a fantastic choice. This recipe delivers perfectly seared steaks …
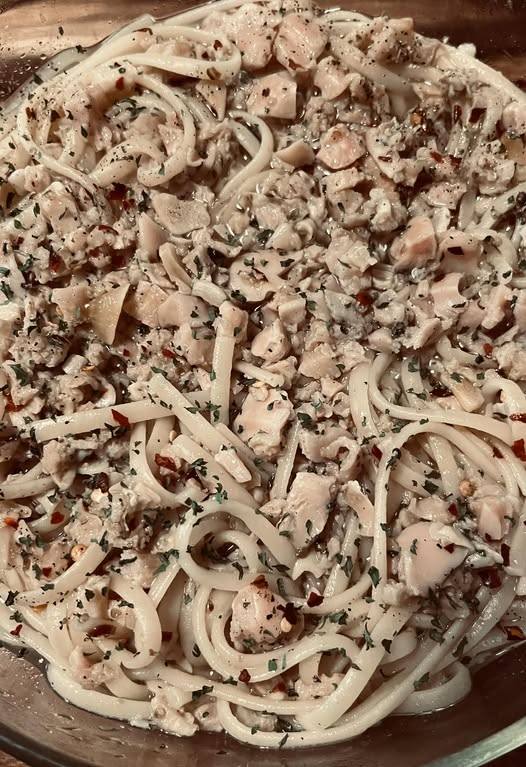
Linguine and White Clam Sauce is a classic Italian-American dish, celebrated for its bright, briny flavors and simple, fresh ingredients. This dish is a wonderful way to enjoy clams paired with perfectly cooked linguine in a garlicky, lemony, and herbaceous sauce that’s light yet satisfying.
Perfect for a quick weeknight dinner or a special occasion, this recipe balances the delicate sweetness of clams with zesty lemon and savory garlic notes. Whether you’re using fresh or canned clams, it’s a great way to bring coastal flavors to your table.
Ingredients
1 lb (450g) linguine pasta
3 tablespoons olive oil
4 cloves garlic, thinly sliced
1/2 teaspoon red pepper flakes (optional, adjust to taste)
2 (6.5 oz) cans chopped clams with juice (or 2 lbs fresh clams, cleaned)
1/2 cup dry white wine
1 cup clam juice or seafood broth
Zest and juice of 1 lemon
1/4 cup fresh parsley, chopped
Salt and freshly ground black pepper, to taste
Grated Parmesan cheese (optional)
Kitchen Tools Needed
Large pot for pasta
Large skillet or sauté pan
Colander or strainer
Wooden spoon
Citrus zester or grater
Knife and cutting board
Instructions
Step 1: Prepare the Pasta
Bring a large pot of salted water to a boil. Add linguine and cook according to package instructions until al dente. Reserve 1 cup of pasta cooking water, then drain the pasta and set aside.
Step 2: Make the Clam Sauce
Heat olive oil in a large skillet over medium heat. Add the sliced garlic and red pepper flakes, if using, and sauté gently for 1–2 minutes until fragrant but not browned.
Step 3: Add Wine and Clam Juice
Pour in the white wine and clam juice (or seafood broth). Bring to a simmer and cook for 3–4 minutes to reduce slightly and concentrate flavors.
Step 4: Add Clams
Add the clams (with their juice, if canned). If using fresh clams, cover the skillet and cook until they open (about 5 minutes). Discard any unopened clams.
Step 5: Combine Pasta and Sauce
Add the cooked linguine to the skillet and toss to coat in the sauce. If the sauce seems dry, add reserved pasta water a little at a time until desired consistency is reached.
Step 6: Finish with Lemon and Parsley
Add lemon zest, lemon juice, and chopped parsley. Toss again to combine. Season with salt and freshly ground black pepper to taste.
Serving Suggestions
Serve this dish hot, garnished with additional parsley and a sprinkle of grated Parmesan cheese if desired. Pair with a crisp white wine like Pinot Grigio or Sauvignon Blanc and a side of crusty Italian bread for a complete meal.
Tips for Success
If using fresh clams, soak them in salted water for at least 30 minutes before cooking to purge sand.
Avoid overcooking garlic to prevent bitterness.
Use good-quality olive oil and fresh lemon for bright, authentic flavor.
For a richer sauce, stir in a tablespoon of butter just before serving.
Nutrition Information (per serving approx.)
Nutrient
Amount
Calories
450 kcal
Protein
25g
Total Fat
12g
Saturated Fat
2g
Carbohydrates
55g
Fiber
3g
Sodium
650mg
Conclusion
This Linguine and White Clam Sauce recipe is a celebration of simple ingredients coming together to create an unforgettable dish. It’s elegant enough for guests yet easy enough for a weekday meal. The harmonious blend of garlic, lemon, fresh herbs, and clams makes this a timeless Italian favorite you’ll want to make again and again.
Prep Time: 30 minutes (active) Resting & Fermentation Time: 12–16 hours (overnight) Bake Time: 45 minutes Total Time: 13–17 hours Difficulty: Intermediate Servings: 1 large loaf (~12 slices) Introduction Few things are more comforting than the smell of fresh-baked cinnamon and warm bread. Combine that …