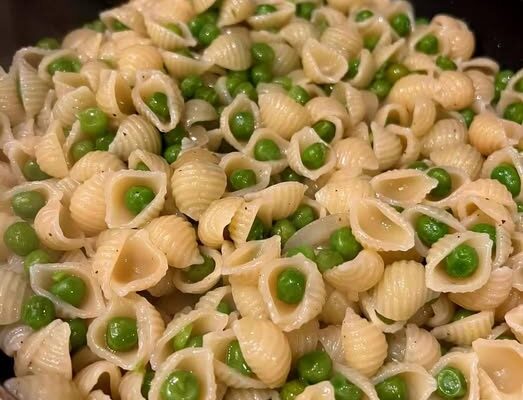
Prep Time: 10 minutes Cook Time: 20 minutes Total Time: 30 minutes Difficulty: Easy Servings: 4 Introduction Pasta e Piselli, or pasta with peas, is a traditional Italian dish rooted in Neapolitan home cooking. It’s one of those meals that proves simplicity is at the …
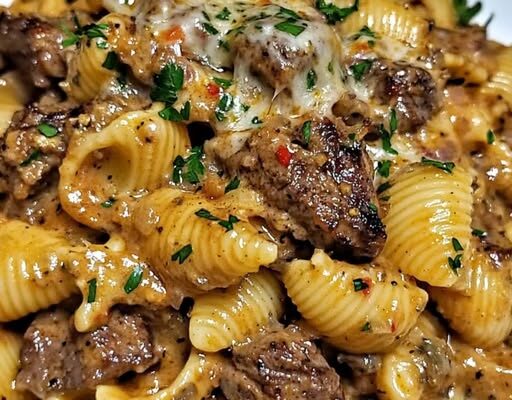
Prep Time: 15 minutes Cook Time: 45 minutes Total Time: 1 hour Difficulty: Medium Servings: 4 Introduction There’s nothing quite like a hearty, home-cooked pork chop dish that brings comfort to the table — and Pork Chop Supreme is just that kind of meal. Rich, …
There’s something truly nostalgic and comforting about pecan pie—its sweet, nutty filling nestled in a buttery crust is a classic Southern favorite. But what if you could enjoy all the flavors of pecan pie in a smaller, quicker, and easier-to-make treat? That’s where Pecan Pie Crescents come in. These delightful little pastries take the rich, caramelized flavor of traditional pecan pie and wrap it inside soft, flaky crescent rolls for a handheld dessert that’s ready in under 30 minutes.
Perfect for holiday gatherings, brunches, or just a cozy night at home, Pecan Pie Crescents offer an irresistible combination of textures and flavors. Best of all, they require minimal ingredients, no special baking skills, and are made using store-bought crescent dough, making this recipe ideal for both beginner bakers and seasoned pros.
Whether you’re preparing for Thanksgiving, hosting a dinner party, or just satisfying a sweet craving, these Pecan Pie Crescents are guaranteed to please.
Ingredients
You’ll only need a handful of simple ingredients to whip up these sweet treats. Here’s what you’ll need:
1 can (8 oz) refrigerated crescent roll dough
3 tablespoons brown sugar (light or dark)
2 tablespoons corn syrup (light preferred)
1 tablespoon unsalted butter, melted
1 teaspoon vanilla extract
½ teaspoon cinnamon (optional but recommended)
¾ cup finely chopped pecans
Pinch of salt
Powdered sugar for dusting (optional)
Kitchen Tools Needed
Mixing bowl
Spoon or silicone spatula
Baking sheet
Parchment paper or nonstick spray
Pastry brush (optional)
Cooling rack
Preparation Steps
Step 1: Preheat the Oven
Start by preheating your oven to 375°F (190°C). Line a baking sheet with parchment paper or lightly grease it with nonstick spray to prevent sticking.
Step 2: Prepare the Pecan Pie Filling
In a small mixing bowl, combine the following:
Brown sugar
Corn syrup
Melted butter
Vanilla extract
Cinnamon (if using)
Pinch of salt
Stir until the mixture is well combined and forms a thick syrup. Then fold in the chopped pecans until they are evenly coated. Set this aside—this is your pecan pie filling.
Step 3: Prepare the Crescent Rolls
Unroll the crescent dough carefully and separate it into 8 individual triangles. Place them on the prepared baking sheet, spacing them a couple of inches apart.
Step 4: Fill and Roll
Spoon about 1 tablespoon of the pecan filling onto the wide end of each triangle. Be careful not to overfill to avoid spillage during baking. Starting from the wide end, roll each crescent triangle toward the point, just as you would a typical crescent roll. If some filling escapes, gently tuck it back in.
For extra shine and crispness, you can brush the tops of the rolled crescents with a little melted butter.
Step 5: Bake
Place the baking sheet in the preheated oven and bake for 12–15 minutes, or until the crescent rolls are golden brown and puffed. Keep a close eye during the last few minutes of baking to prevent over-browning.
Step 6: Cool and Serve
Remove from the oven and let the crescents cool on the baking sheet for 5 minutes before transferring them to a cooling rack. The filling will be hot, so allow them to cool slightly before eating.
Dust with powdered sugar if desired, and serve warm or at room temperature.
Tips and Variations
Make it richer: Add a few mini chocolate chips to the filling for a pecan pie-meets-chocolate croissant twist.
Add a glaze: Drizzle with a simple glaze made from powdered sugar and milk or cream.
Make it spiced: Add a pinch of nutmeg or allspice for a more autumnal flavor.
Nut alternatives: Substitute walnuts or chopped almonds if you don’t have pecans on hand.
Serve with ice cream: These crescents pair beautifully with a scoop of vanilla ice cream or a dollop of whipped cream.
Storage Instructions
Store any leftovers in an airtight container at room temperature for up to 2 days, or in the refrigerator for up to 5 days. To reheat, pop them in a toaster oven or microwave for 10–15 seconds.
These crescents can also be frozen before baking. Just prepare and roll them, then freeze on a baking sheet until solid. Transfer to a freezer bag and store for up to 1 month. Bake from frozen, adding 2–3 extra minutes to the bake time.
Nutrition Information
(Per Crescent Roll – approximate values)
Nutrient
Amount
Calories
210
Total Fat
13g
Saturated Fat
3g
Cholesterol
10mg
Sodium
160mg
Carbohydrates
23g
Fiber
1g
Sugar
12g
Protein
2g
Note: These values are approximate and may vary depending on the brand of crescent dough and other ingredients used.
Why You’ll Love This Recipe
Quick and Easy: Ready in under 30 minutes from start to finish.
Crowd-Pleaser: A hit with kids and adults alike.
No Pie Crust Required: Crescent dough keeps it simple and flaky.
Perfect for Holidays: A great addition to dessert trays or brunch spreads.
Portable: Great for potlucks, bake sales, and lunchbox treats.
Conclusion
If you’re craving the comforting flavors of pecan pie but don’t have time to bake a whole pie from scratch, these Pecan Pie Crescents are the answer. They’re buttery, flaky, sweet, and nutty—everything you love about pecan pie, in a convenient little roll.
This recipe is proof that you don’t need to spend hours in the kitchen to make something special. With just a few pantry staples and a roll of crescent dough, you can whip up a dessert that feels indulgent but is surprisingly easy to prepare.
Give this recipe a try the next time you need a quick dessert, and don’t be surprised when they disappear in minutes. Happy baking!
Prep Time: 15 minutes Cook Time: 4–6 hours (low) or 2–3 hours (high) Total Time: 4.5 to 6 hours Servings: 6–8 Difficulty: Easy Flavor Intensity: Comforting, rich, cheesy
Introduction
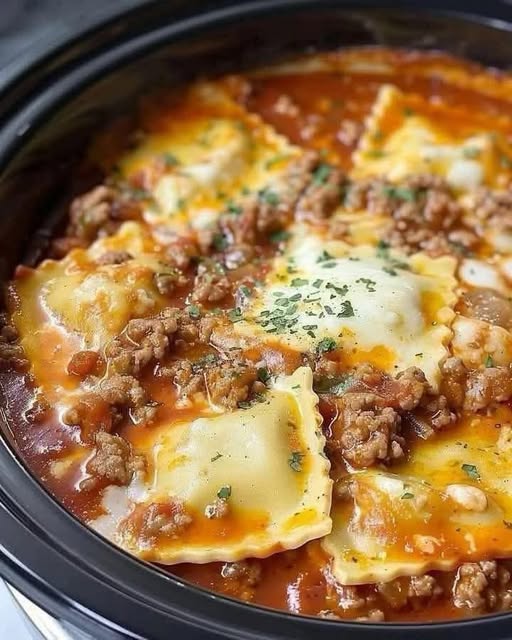
Craving lasagna but not the layering, boiling, and baking? Say hello to your new favorite time-saving comfort food: Crockpot Ravioli Lasagna! This dish combines the classic flavors of lasagna—meaty sauce, rich cheese, and tender pasta—but replaces lasagna noodles with store-bought cheese ravioli for ultimate convenience.
Made entirely in your slow cooker, it’s the perfect hands-off dinner for busy weeknights, game days, or lazy Sundays. Just layer, set it, and forget it. When you’re ready to serve, you’ll have a hearty, family-friendly meal bubbling with flavor.
Why You’ll Love This Recipe
No need to pre-boil pasta
Uses frozen ravioli straight from the bag
Perfect for make-ahead meals and potlucks
Customizable with meat or veggies
Leftovers reheat beautifully
Ingredients
For the Sauce Layer:
1 lb ground beef (or Italian sausage)
1 small onion, finely chopped
2 cloves garlic, minced
1 (24 oz) jar marinara sauce
1 (15 oz) can crushed tomatoes (or more marinara)
2 tsp Italian seasoning
Salt and black pepper, to taste
For the Lasagna Layers:
1 (25 oz) bag frozen cheese ravioli (do not thaw)
2 cups shredded mozzarella cheese
1 cup ricotta cheese (or cottage cheese)
1/2 cup grated Parmesan cheese
Optional: 1 cup chopped spinach, for extra greens
Garnish (Optional):
Fresh basil or parsley
Extra Parmesan
Step-by-Step Instructions
Step 1: Brown the Meat
In a skillet over medium heat, cook ground beef, onions, and garlic until meat is browned and onions are translucent (about 7–8 minutes).
Drain any excess fat.
Stir in marinara, crushed tomatoes, Italian seasoning, salt, and pepper.
Simmer for 5 minutes, then remove from heat.
Shortcut Tip: You can use 2 jars of marinara if you don’t want to use crushed tomatoes.
Step 2: Mix the Ricotta
In a bowl, combine:
1 cup ricotta (or cottage cheese)
1/4 cup grated Parmesan
Optional: a pinch of Italian herbs or black pepper
Step 3: Layer in the Crockpot
Grease the inside of your 6-quart slow cooker lightly with oil or cooking spray.
Now start layering:
Meat Sauce: Spoon a layer of sauce into the bottom of the crockpot.
Ravioli: Add a single layer of frozen ravioli (no need to thaw!).
Ricotta Mixture: Dollop spoonfuls across the ravioli.
Mozzarella: Sprinkle 1/3 of the mozzarella on top.
Repeat the layers 2–3 times depending on the size of your slow cooker, finishing with:
A final layer of sauce
Mozzarella cheese
Grated Parmesan
Step 4: Cook
Cover and cook on:
LOW for 4–6 hours or
HIGH for 2–3 hours
You’ll know it’s done when the ravioli is tender and the cheese is melted and bubbly.
Don’t overcook! After 6+ hours on low, ravioli can become too soft.
Step 5: Rest & Serve
Turn off the slow cooker and let the lasagna rest for 10–15 minutes with the lid off. This helps it firm up and makes serving easier.
Sprinkle with chopped parsley or basil and serve with garlic bread or salad.
Make It Your Own
Meat Lovers Version
Use half ground beef and half Italian sausage. You can also add pepperoni slices to the layers for a pizza-lasagna hybrid.
Vegetarian Version
Skip the meat and sauté chopped mushrooms, zucchini, and spinach to mix into the sauce.
Spice It Up
Add red pepper flakes or a few spoonfuls of spicy arrabbiata sauce for heat.
Extra Cheesy
Use a 4-cheese Italian blend, or add provolone and fontina for richness.
Serving Suggestions
Pair your Crockpot Ravioli Lasagna with:
Garlic bread or focaccia
A simple Caesar or garden salad
A glass of red wine (Chianti or Merlot)
Sparkling lemonade or iced tea for a family-friendly meal
It’s also perfect for meal prep—just divide into containers and refrigerate or freeze for later.
Storing & Reheating
Refrigerator:
Store leftovers in an airtight container for up to 4 days.
Freezer:
Freeze in single portions for up to 2 months. Thaw in the fridge overnight before reheating.
To Reheat:
Microwave individual portions for 2–3 minutes until heated through.
Reheat larger portions in the oven at 350°F for 15–20 minutes, covered.
Nutrition Info (Per Serving)
Nutrient
Amount (Approx.)
Calories
450–500 kcal
Carbohydrates
35g
Protein
24g
Fat
26g
Saturated Fat
12g
Sodium
900mg
Fiber
4g
Values may vary depending on brand of ravioli, cheese, and sauce used.
Frequently Asked Questions
Can I use fresh ravioli instead of frozen?
Yes! Just reduce the cooking time slightly (by about 30–45 minutes on low). Keep an eye on it so the ravioli doesn’t overcook.
Do I have to cook the meat first?
Yes, for food safety and flavor, always brown the meat before layering it in your crockpot.
Can I double this recipe?
You can if you have an extra-large slow cooker (8+ quarts). Add 30–60 minutes to the cooking time if doubling.
Can I make it without meat?
Absolutely! It’s just as delicious as a vegetarian dish. Add extra vegetables or mushrooms for a hearty meat-free version.
Conclusion
This Crockpot Ravioli Lasagna is the ultimate no-fuss comfort food. With layers of cheesy ravioli, rich tomato sauce, and a gooey topping, it’s everything you love about lasagna—without all the work. Whether you’re feeding a crowd or prepping easy weeknight dinners, this slow cooker recipe is guaranteed to become a family favorite.
Set it, forget it, and get ready to dig into layers of cheesy, saucy satisfaction.
Prep Time: 15 minutesChill Time: 4 hours or overnightBake Time: 45–50 minutesTotal Time: ~5 hours (includes chill time)Serves: 8Difficulty: EasyFlavor Intensity: Sweet, tropical, and rich Introduction Craving a sweet, tropical twist on a brunch classic? This Hawaiian French Toast Bake is everything you love about …
Prep Time: 45 minutesCook Time: 30–40 minutesTotal Time: 1 hour 15 minutesServes: 6–8Difficulty: ModerateIntensity: Festive, spicy, and full of flavor Introduction Few dishes capture the bold, communal spirit of Southern cooking quite like a Louisiana Crawfish Boil. This spicy, aromatic feast is more than just …
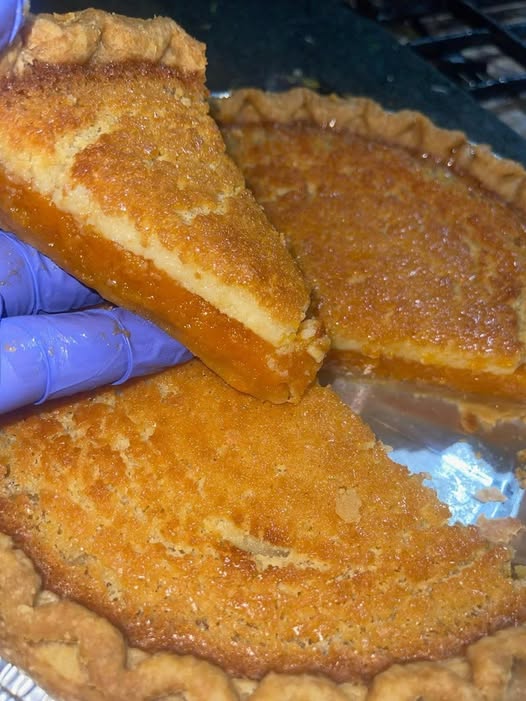
Prep Time: 25 minutes Cook Time: 1 hour Cooling Time: 2 hours Total Time: ~3.5 hours Servings: 8 Cuisine: Southern American Category: Dessert / Pie Best For: Holidays, fall baking, family gatherings
Introduction
Buttermilk Sweet Potato Pie is a classic Southern dessert that’s creamy, custardy, slightly tangy, and perfectly sweet. The sweet potatoes provide natural richness and depth, while buttermilk adds that signature Southern tang. A touch of warm spices — cinnamon, nutmeg, and vanilla — tie it all together in a buttery, flaky crust.
This pie is similar to pumpkin pie, but with more body, soul, and a natural caramel flavor from the sweet potatoes. It’s a staple at Thanksgiving tables, but it’s just as delicious year-round.
Ingredients
For the Pie Filling:
1 cup mashed sweet potatoes (from about 2 medium sweet potatoes)
½ cup unsalted butter, melted
1 cup granulated sugar
½ cup light brown sugar, packed
3 large eggs
¾ cup buttermilk
1½ teaspoons vanilla extract
½ teaspoon ground cinnamon
¼ teaspoon ground nutmeg
¼ teaspoon salt
For the Crust (or use store-bought):
1¼ cups all-purpose flour
½ teaspoon salt
½ cup (1 stick) cold unsalted butter, cut into cubes
3–4 tablespoons ice water
Shortcut: Use a store-bought 9-inch deep-dish pie shell if preferred.
Instructions
Step 1: Prep the Sweet Potatoes
Roast or boil your sweet potatoes until fork tender:
Roast: Pierce and bake at 400°F for 45–60 minutes.
Boil: Peel, cube, and boil for 15–20 minutes.
Cool slightly and mash until smooth. Measure out 1 cup for the recipe.
Step 2: Make the Pie Crust (Optional)
In a mixing bowl, combine flour and salt.
Cut in the cold butter with a pastry cutter or fork until crumbly.
Add ice water 1 tablespoon at a time, mixing just until dough forms.
Flatten into a disk, wrap in plastic, and chill for at least 30 minutes.
Roll out on a floured surface and fit into a 9-inch pie plate. Trim and crimp the edges. Refrigerate until ready to fill.
Tip: For an extra flaky crust, freeze it for 10 minutes before baking.
Step 3: Make the Filling
Preheat oven to 350°F (175°C).
In a large bowl, whisk together the mashed sweet potato, melted butter, sugars, and eggs until smooth.
Add buttermilk, vanilla, cinnamon, nutmeg, and salt.
Whisk until fully combined and silky.
Step 4: Fill and Bake
Pour the filling into your prepared (unbaked) pie crust.
Bake for 50–60 minutes, or until:
The center is mostly set (a slight jiggle is okay)
A knife inserted near the center comes out clean
Tip: Cover the crust edges with foil or a pie shield if they brown too quickly.
Step 5: Cool and Serve
Let the pie cool completely at room temperature for at least 2 hours.
Serve as-is or with a dollop of whipped cream or vanilla ice cream.
For best texture, refrigerate at least 4 hours or overnight before serving.
Storage
Refrigerator: Store covered for up to 4–5 days
Freezer: Freeze for up to 2 months (wrap tightly in plastic + foil)
To Serve from Freezer: Thaw overnight in fridge; bring to room temp before serving
Nutrition Info (Per Slice – Approximate)
Nutrient
Amount
Calories
420 kcal
Fat
22g
Carbs
50g
Sugar
34g
Protein
5g
Fiber
2g
Sodium
210mg
Nutrition will vary slightly depending on crust and serving size.
Tips & Variations
No buttermilk? Make a substitute: mix ¾ cup milk + 2 tsp lemon juice or vinegar. Let sit for 5 minutes.
Make it spicier: Add a pinch of cloves or allspice for more warmth.
Don’t like crust? Bake in ramekins for a crustless version!
Gluten-free option: Use a gluten-free pie crust or crustless.
Make it richer: Add 1–2 tbsp bourbon or dark rum to the filling for depth.
Final Thoughts
Buttermilk Sweet Potato Pie is soul food at its finest — rich, creamy, tangy, sweet, and loaded with warmth and comfort. It’s the kind of dessert that makes you close your eyes after that first bite. Whether you’re making it for a celebration or just because it’s a Tuesday and you need something beautiful in the oven — this pie delivers.
Easy to make. Hard to resist. Always a crowd-pleaser.
In a world overrun by oat-heavy, banana-laden pancake recipes demanding the constant roar of a blender, I set out to create something different: the ultimate Protein Pancakes—no oats, no bananas, no fancy equipment required. These gluten-free, keto-friendly stacks pack an impressive 40 grams of protein …